This guide provides a quick overview of what to expect and addresses what players commonly find confusing when they first start during closed beta.
- While in-game, look for the Landmark logo icon in the top left corner of your screen; when you click on it, it opens a menu, from which you can choose to access the Help menu. The Help menu includes information similar to what you will find here too. This can also be toggled open by pressing F12.
- Press J to see the Journal with its goals and recipes. It acts like a very free-form tutorial in some respects, by guiding you to and through many things that you can do in Landmark. Some achievements also reward you with highly valuable tools, utility items, and basic Gear and Equipment.
Rather than describe every detail about each thing that may be new to you, a Suggested Reading section at the near the end of this article will help you pick a related topic so that you don't have to follow in-text links within the text unless you want to. In some cases, related topics are positioned near the end of specific sub-sections to accommodate readers who may only read parts of this guide.
- You can also return to the menu-list of User Guides for even more options.
About Launch[]
- The game's official, open and public launch was on June 10th, 2016.
- Note: the rate at which this game changed between beta and launch was fast. Therefore much of the info below may still be inaccurate. Please take a moment to correct any errors for the sake of the entire community.
The guide has been updated in late May 2015, during closed beta. The updates below reflect the May 5th, 2015 update that changed countless thing in the game. If you have been away, you will want to read the Update notes on the forums.
As you look around the wikia, you'll notice many pages have a section for Beta Bugs (if they first appeared in beta) or Potential Bugs (if they may persist into the live launch). Bugs listed there may or may not have been fixed, but those that have been reported often or that seem to recur are typically listed so you know why an issue may arise.
Even though the game is officially live, please report any bugs you encounter, as it improves the game further and even the oldest games have bugs. In game you can type /bug in a chat window and describe the problem and any details about what may have caused it (eg. the game freezes when using the spire) or head to the forums and look for the special section to report bugs.
- Players who participated in alpha and closed beta that may have been away during launch may want to read the Wipe Q&A thread posted prior to launch, which may answer questions you have about the (last round) of major changes before launch and perks granted to you for being a tester and any purchases made using the Marketplace.
Early Launch Advice[]
- The community is usually helpful, so ask questions. Bear in mind that replies may take awhile if they have bugged chat and don't realize that they have lost general chat.
- Most of the pages on this wikia that have been updated recently will mention closed beta and the month and year in bold at the top of the page. Even so, not all updates can be added here immediately so ask in chat or ask questions on the forums.
Terminology[]

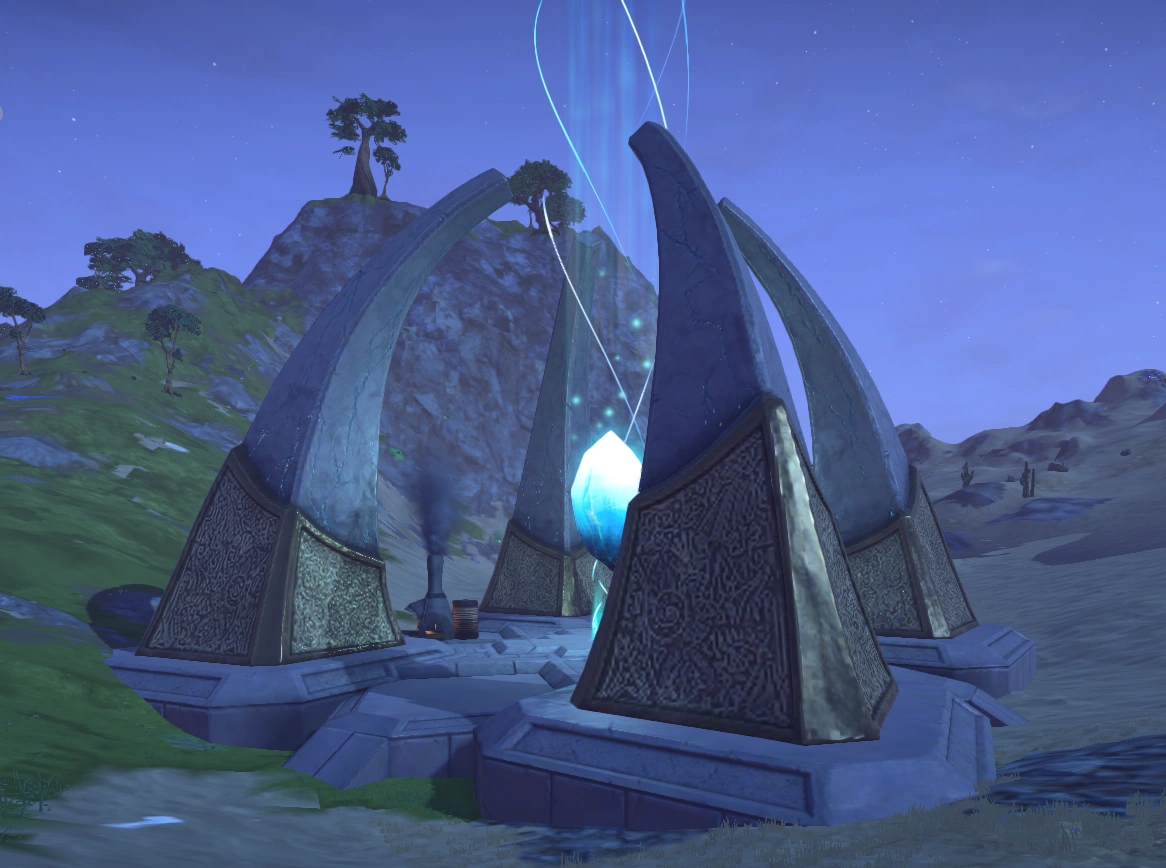
Above: The Portal Spire is where you will go to travel to other servers and landscapes and craft when you're starting out.
- Build Site is used to describe the area in which a player can build anything they can dream up, since Landmark is a "genre agnostic" game (not limited to fantasy themes, sci-fi, etc). You can have more than one build site, but the word is often used to describe an entire area that a player is building in, not just a single area set aside using a Build Site Flag.
- Spire is a word that is familiar to EQ and EQ2 players. For those starting, it refers to a large structure with a floating crystal that must be clicked on to travel to and from landscapes and servers. The spire also has a mailbox all of the station you need to craft items like a Build Site Flag, picks for mining, etc. You must get very close the the floating crystal, look up and when the hand icon appears, click to open the travel options.
- When you travel, you'll see servers listed as "Worlds" and each of these has "Landscapes" (similar to "zones" in other games). For more info on how this works see the Servers and Landscapes page, which also describes different types of servers and landscapes. See the Spire page for details about what's there and how to use it.
- Materials is a general term for anything in Landmark that the player gathers using picks, axes, and sickles. Materials are used both to build on a build site and to make items when you craft. The word harvestable or harvests is frequently used in a general manner as well, per the habit of many long-time EQ and EQ2 players (where the word is common lingo).
- Tier describes progression of materials you gather to craft (eg. make gear, like picks for mining) better gear and equipment, like a faster axe. Though it may seem like "levels" in other games it's akin to range of levels in a game that has no levels for characters.
- Biome refers to the differing environments (desert, snow, etc) that you will see on the landscapes. At this time, Landmark has 6 Biomes and any 2 can be on the same map. Different biomes must be visited to gather materials used to craft gear, because each has unique mix Trees that can only be harvested there. Though the materials themselves have tiers associated with them, you do not need to visit an landscape of that associated tier. Instead, you can go to any landscape that has the biome from which you must harvest. Again, see the Servers and Landscapes page for details or the Trees page for info and images about specific trees.
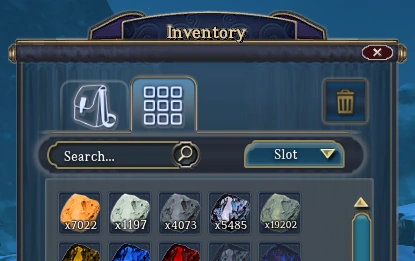
- Inventory is typically used to describe what most people think of as a bag in many games. In Landmark, pressing i opens inventory, but it has has two tabs at all times. One tab (a Bag icon) for normal things you'll carry and the second (a cluster of squares icon) on a tab that holds the materials you gather. Should you delete a build site or fail to pay upkeep, third tab with icon that looks like a clock appears, and you need to remove contents within 24 hours. Because it is unlike other games you may want to read more about Inventory, so you know how to expand it and where your items are going to as you gather materials.
Your First Day in Landmark[]

Inventory Materials Tab
When you create a character in Landmark, you can choose a server (world) to start on and you will be randomly placed on an Pioneer Landscape and you will already have a special, flat build site.
Though you are asked to choose a server, you are not obligated to stay on that server, because players can travel to and from different servers freely in order to visit build sites or choose a build site of their own if the server they chose is too crowded at the time they want to place a build site.
Although you will have the basic grappling hook, starter armor and a weapon, and all of the basic gathering tools.
You are not obligated to stay on the Pioneer Landscape and build, but it is perfectly flat to make it easy for brand new players to learn how to place Designs, Props, and learn to use the basic Building Tools. If you want to move your build site to a new location (off of the Pioneer Landscape) you must be at the build site, press U to open the building management window, and click the Delete Build Site button.
Doing so will place a Build Site flag back in your Inventory, in the section that looks like a clock. You must move items from that section within a limited time or they will expire; should you forget to move the flag though, you can create a new one without any materials at any Spire.
As soon as you begin, press J to open the Journal. It will help you learn about what you can do in Landmark and it also provides some rewards for completing achievements that are highly useful when starting out.
Gathering Materials and Crafting[]


A hotbar with harvesting tools and harvest-related gear. L to R: a pick, an axe, a sickle, a lightstone, a rockgrinder, the ore prospector, and ground sounder.

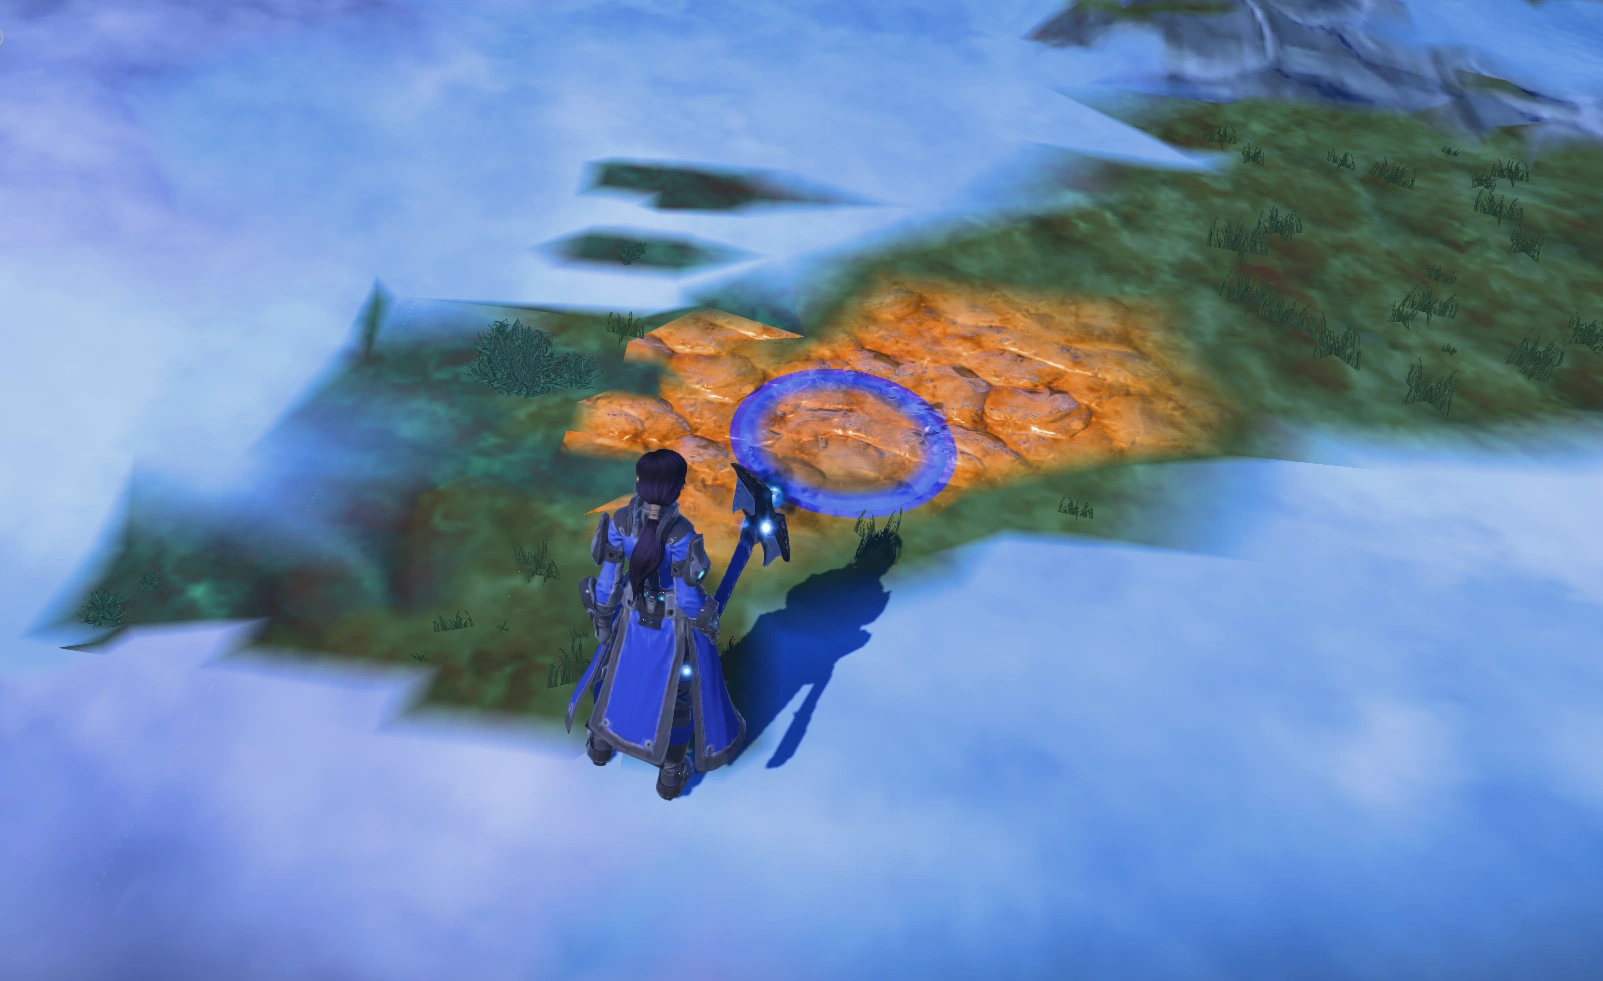
A copper vein with the mining target circle.
Most of the ore, gems, and uncommon stone you want to build with can be found on the surface, just by wandering around and looking for unusually-colored spots on the ground. You will use the Spires and the instant travel system to go deep into Chaos Caverns to mine too.
If you are out and about in the world and walk into another player's build site area (or your own), you can't harvest there. Each build site has a "buffer zone" around it though, so materials can be gathered. It takes (most) of the land around you about 20 minutes to repair itself after you wreak havoc, so don't worry about destroying the ground or deforesting the area.
Equipping and Using Tools[]
- Info in this section may need updates.
In order to begin gathering, you first need to equip your pick to mine and axe to chop down trees. If you start with stone tools, they should already be in the hotbar. If not, press i to open your inventory and drag them to the hotbar. When you want to use a tool, L click to activate it. When you want to put a tool away press ESC.
As you progress in Landmark, you will need to upgrade your tools. For example, some trees can only be chopped down with an axe of a minimum tier; if you try to chop a tree and can't, it's time to open the Journal (J), look at the recipes for the Replicator and plan to gather what you need to upgrade your tool. If you try to gather something that your tools can not mine (etc.) you'll hear two, rapid, flat "clunks".
- Mining: Your pick will have a circular target-indicator; it must be blue to mine and if it's red, are too far away or in an off-limits area like a build site. When mining you will have to click to strike area you are mining each time. General descriptions of what you can mind is described in the next section.
- Which trees you cut down matters too, as some trees give plain wood or striped wood and so on; see the Trees for details When cutting down trees, you can double click and your character will keep chopping.
- To learn more about tools and upgrading them so you gather more efficiently (and faster) see the Gathering Tools page.
- To learn about which trees give specific materials see the page about Trees.
What to Gather[]
When you are out gathering nearly everything you encounter in the natural landscape can be gathered (if you have the right tools). Most notable is the land itself; hitting the ground with a pick will give you dirt, sand, and stone depending on the type of biome and area you are in. The primary use for these materials is building on build sites, so gathering them is often worthwhile.
There are two general categories of materials you can harvest, that can be used to craft items (eg. gear, potions) or build on a build site. They are identified by looking for:
- Ore and minerals: ore will have a lumpy surface texture and a somewhat shiny metallic look. Minerals either rather rough textured or have a crackle texture and range from matte textures to glossy. Both ore and minerals come in a wide range of colors and many mimic real-world precious metals and gems.
- Trees: trees come in many varieties and have different looks depending on the biome they are located in. For example, there are snowy pines in the Tundra Biome and palm trees in the Tropical Biome. There are three different types of logs depending on the trees (with different styles for building) and the special materials used in crafting typically comes from very narrow trees (though not always).
Where to Gather[]
- Info in this section may need updates.
Where you need to go to gather depends on your goal, but the basic things you need to know are that:
- The most common ore and minerals can be found on the surface, but you need to enter Caves to get the vast majority of materials of this general category. Before you jump into the very deep drop-offs in caves, make a Grappling Hook. If you forget, hit ESC and choose Evac from the list to return to the top of a cave.
- Trees are...complicated. As mentioned in the Terminology section and just above, they are in different biomes and you'll need to be able to spot the specific for getting semi-rare crafting components.
- See the page about Gathering for more details on the overall activity, the Mining Guide, or the page about Trees.
Crafting[]
The crafting process is fairly simple. The same resources you gather for building can be used to make all types of gear and equipment.
- You can craft items at any spire if you are away from your build sites.
- You can place a Replicator (the only true crafting station) on your sites using the Prop Palette tab of the mega-palette while in Build Mode.
- See the Crafting page for more info on the topic.
Tips and Tricks[]
- When looking for a specific ore or mineral, press i to open your inventory. You can see the types you can gather in the materials tab and the icons are the same color as the ore and minerals you need to fine.
- If you are having trouble finding specific surface ore or minerals, go to a biome where the ground contrasts with what you need. For example, it is easier to see Obsidian (black) in snowy tundra terrain.
- Unlike other games, Landmark want gathering to be social activity. Team up with one or more friends and as long as you are within (approximately) 200m of each other everyone harvesting gets the exact same materials. Split your Party up into different tasks to get more variety or focus on only mining (etc.) to get one type of material in larger quantities.
Build Sites and Building[]
Because the ability to choose a build site and build anything you dream up is so alluring, it's the first thing people have on their minds when they run off into the world. The basic things you need to know:
- About build sites:
- Unless the landscape you are on is very crowded, wander to different landscape and see the each biome. For example, your dream fortress may be better suited to a snowy mountainside and you may be standing in the balmy desert.
- If the server you picked seems very crowded in the type of biome you want to build in, remember, you can go to other servers. The landscapes with the same names on each server look the same, so you can look for more locations on other servers. Chat is (now) cross-server.
- The number of build sites we can have is changing, but you you get more than one, so don't worry if you are unsure about where to build and what to build.
- About building:
- Before you can begin building, you will need to craft Blocks of materials at the Replicator. You can find one at the Spire or you can place one on your Build Sites by using the Prop Palette.
- You can build in an area you place a build site or build sites you've been granted access to by friends.
- You will get all of the building tools as soon as you place a build site.
- Building looks complicated and using some of the tools take practice, but you'll find many tutorials (written, video) on the forums, here and on Twitch and YouTube. Many players who stream on Twitch focus on teaching people to build and some will answer your questions and demonstrate techniques you ask about. Tools have been updated many times, so the newer the recorded video or more recent the written tutorial, the more likely it is to be accurate. Ask on for help on the forums. It's a great community!
- Anything you build can be saved as a Design; it's rather like having a file folder on your PC with your pictures and you can save things under new template names. It makes experimenting is easy (save often at first) and you can delete a whole build site (or forget to pay upkeep) and the entire build site is automatically saved as a template. Though there will be a server wipe between closed and open beta, you will get to keep your templates (but not your materials and crafted gear)
- The process of placing a build site entails understanding many details like how to see where you can stake a build site, earning time toward upkeep, and setting permissions to invite friends to build with you. See the Build Sites page for that info and more, with useful images and videos. To get a better sense of what building is about, see the Building page or if you're the type to who wants to get started as soon as you can, take a look at the Building Tools to learn the basics of what each tool is used for, along with keyboard commands and shortcuts.
Recommended Gear[]
To make your life in Landmark easier, you might consider making these wonderful items as soon as you can:
- Grappling Hook you start with a basic hook, but upgrade this gear. It's a great way to get out of caves, but also amazing for traveling up and over the many mountains of Landmark.
- Lightstone will light your way in the darkness of caves and help you find loot-laden Chests
- Extractor let you drill your way underground and gather both mined and log trees. Not only is this useful in caves, it's just darn fun to run around with an giant drill.
- Any or all of the following are very useful: a Ore Prospector, Ore Prospector, and Cave Seeker to use in caves and Chaos Caverns.
Gallery of UI Windows[]
landscape The following numbered images below will help you identify important elements of the User Interface (UI) that you'll use regularly. Click on any of them if you want to see the screenshots at full size. Just a few that elude people are shown here. See the suggested reading in this section for more info.
- Info needs to be updated
- Info needs to be updated
- Info needs to be updated
- Info needs to be updated
New players may want to read the following pages, to help them understand Landmark's User Interface (UI):
- User Interface describe what each element on your screen is and its purpose. For example, you can tell which server and landscape you are on by looking in the upper left corner of the screen at any time.
- Controls has all of the keyboard commands and shortcuts you will want to use while playing. You can also press ESC while in-game and click Customize Controls to look up the shortcuts you forget. Keys can be rebound, but its not recommended until you have played for awhile and understand how many different keys are used for different purposes in different situations.
Suggested Reading[]
For more detailed info on the topics briefly covered here you can read about:
- Servers and Landscapes and Spire
- Crafting and Gathering
- Lumens
- Build Sites and Building
Potential Bugs[]
Many bugs are afoot and many come and go with many updates. You'll notice that most recently updated articles and pages mention of this wiki bugs specific to the topic (like the mysterious vanishing trees) The notes below focus on the most common bugs related to performance. The Landmark forums also has a special area to report bugs/ask for help. Check there and post if you encounter something new.
- Many players are still experiencing game-freezes and some crash to desktop too.
- In case of a freeze (often when you use the spire) press CTRL + Alt + Delete. The game will minimize and bringing it back to full screen typically un-freezes the game.